In technical drawing, accurate representations of objects is
very important for effective communication between designers, engineers, and
manufacturers. One basic aspect of this process is to create the orthographic
views, which provide details of an object's dimensions, shapes, and features
from various perspectives.
Orthographic Views
Orthographic views, also known as multi-view projections,
depict an object using two or more flat 2D images, each showing a different
side or perspective. These views are essential for conveying a comprehensive
understanding of an object's form and structure.
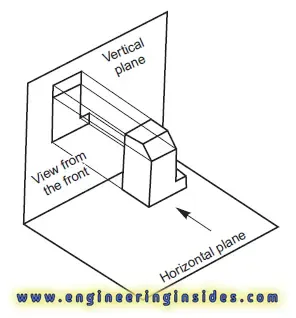
View from the Front
The view from the front of an object is obtained by
projecting it onto a vertical plane while looking directly at its front
surface. This perspective is crucial for capturing the primary features and
details of the object.
View from Above
The view from above illustrates the object's projection onto
a horizontal plane, observed by looking down on its top surface. This
perspective provides valuable information about the object's layout and spatial
arrangement.
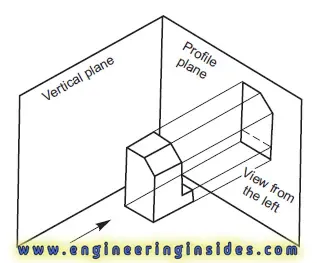
View from the Side
The view from the side involves projecting the object onto a profile plane while looking perpendicular to its side surface. Since objects have two distinct sides, left and right, two separate views – one from the left and one from the right – can be obtained to depict the object comprehensively.
Importance of Orthographic Views
Clarity and Precision: Orthographic views ensure that every
aspect of the object is represented accurately, facilitating clear
communication among stakeholders.
Dimensional Analysis: Engineers and designers rely on
orthographic views for precise measurements and dimensional analysis, aiding in
the manufacturing and assembly processes.
Error Reduction: By providing multiple perspectives,
orthographic views help identify potential design flaws or discrepancies early
in the development phase, minimizing errors and costly revisions later on.
Methods for Obtaining Orthographic Views
Front View:
Position the object such that its front surface is directly
facing the observer.
Project the object onto a vertical plane perpendicular to
the observer's line of sight.
Capture all significant features and details visible from
the front perspective.
Top View:
Place the object on a horizontal plane.
Observe the object from directly above, looking down onto
its top surface.
Project the object onto the horizontal plane to create the
top view, highlighting its layout and spatial arrangement.
Side View:
Choose the desired side of the object (left or right).
Position the object such that the chosen side surface is
perpendicular to the observer's line of sight.
Project the object onto a profile plane to obtain the side
view, capturing the features specific to that side.
Practical Applications of Orthographic Views
Engineering and Design: Orthographic views are widely used
in engineering and design to create technical drawings, schemes, and blueprints
for various projects like architectural structures and mechanical components.
Manufacturing and Fabrication: Manufacturers rely on
orthographic views to understand the precise dimensions and specifications of
the products they are tasked with producing, ensuring accuracy during
fabrication processes.
Education and Training: Students studying technical subjects
like engineering, architecture, and industrial design learn to translate and
create orthographic views as part of their curriculum which develops effective
skills for their future careers.
Orthographic views play a crucial role in technical drawing,
providing detailed and accurate representations of objects from multiple
perspectives. By mastering the methods for obtaining these views and
understanding their significance, designers, engineers, and manufacturers can
enhance communication, reduce errors, and streamline the design and production
processes.
Frequently Asked Questions
1. What are orthographic views, and why are they essential
in technical drawing?
Orthographic views, also known as multi-view projections,
are 2D representations of objects from different perspectives, such as front,
top, and side views. They are vital in technical drawing because they provide
comprehensive insights into an object's dimensions, shapes, and features,
facilitating clear communication and accurate depiction for design,
engineering, and manufacturing purposes.
2. How is the view from the front of an object obtained, and
what information does it convey?
The view from the front of an object is obtained by
projecting it onto a vertical plane while looking directly at its front
surface. This perspective reveals most of the important features of the object,
including its shape, contours, and significant details, aiding in visualizing
its overall appearance and structure.
3. Describe the process of obtaining the view from above of
an object.
The view from above of an object is acquired by projecting
it onto a horizontal plane while observing it from directly above, looking down
on its top surface. This perspective provides valuable information about the
object's layout, spatial arrangement, and relationships between different
components or elements.
4. Why are there typically two possible views from the side
of an object, and how are they obtained?
Objects have two distinct sides, left and right, leading to
two possible views from the side: view from the left and view from the right.
These views are obtained by projecting the object onto a profile plane while
looking perpendicular to its respective side surface, allowing for a
comprehensive depiction of the object's features from both perspectives.
5. What are some practical applications of orthographic
views in various industries?
Orthographic views find widespread applications in
engineering, design, and manufacturing industries. They are used to create
technical drawings, blueprints, and schematics for architectural structures,
mechanical components, and other products. Manufacturers rely on orthographic
views to ensure accuracy during fabrication processes, while students in
technical fields learn to interpret and create these views as part of their
education and training.
6. How do accurate orthographic views contribute to error
reduction in the design and manufacturing processes?
Accurate orthographic views help identify potential design
flaws or discrepancies early in the development phase, minimizing errors and
costly revisions during the manufacturing process. By providing multiple
perspectives and precise measurements, orthographic views enable engineers and
designers to detect and address issues before they escalate, ensuring the final
product meets quality standards and specifications.


